Compress Hip Hop Beats
A lot of our readers know that a weak beat can be strengthened with a compressor, but what settings are best for what applications? What are the optimal compression settings for a Hip Hop snare, kick, bass, or percussion? In Hip Hop, if you want to compress like the best, you need knowledge of standard compressor settings used by Hip Hop producers. Though this tip deals expressly with Hip Hop, it applies also to House, Trip Hop, Crunk, Grime, any genre requiring maximum punch. We use Kjaerhus Audio’s free audio compressor, the Classic Compressor, to explain which settings dictate which audible result, then we go in-depth by looking at advanced settings using the Sonalksis SV-315.
 1) Ratio & Threshold settings dictate amount:
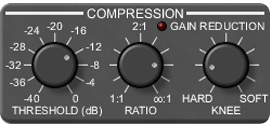
In most Hip Hop applications, many heavy weight producers use ratios of 4:1 to 7:1. Ratios of 8:1 & above are more effective for limiting, not compression. Pros generally use threshold settings that range from 10db to 15db of gain reduction on kicks, snares, percussion, bass, or guitar. At left, using the Classic Compressor to shape the sound of an acoustic kick drum, we’ve set the compressor threshold to -12.4 dB of gain, with a compression ratio of 5:1. Once you’ve decided on the best compressor ratio and threshold settings, you’re ready to add real heat to your beat by using the compressor attack and release settings.
2) Knee dictates sharpness of onset:
The other parameter you see in the above diagram is the compressor knee. When set to “hard,” the compressor reduces gain as soon as the gain level exceeds the threshold. When set to “soft,” the gain reduction is applied gradually as the gain of the signal approaches the threshold, yielding a gentler effect. This parameter isn’t key to optimizing beats, but should be used for compression that’s less abrupt.
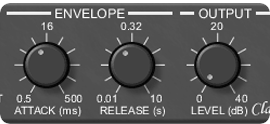
To ensure the most punch per track in your mix, you need to assign each track it’s own compressor attack settings, one at a time. Starting with the kick, set your attack to its fastest possible setting. Next, increase the time of the attack until the kick’s timbre dulls slightly. Once you’ve reached that point, decrease the attack time slightly to recover the original kick timbre, and leave it at that setting. Again, using the Classic Compressor, we’ve set a value of 9.75ms, preserving the kick’s original timbre and sustain, but also adding presence and power. Repeat this method for every track that needs satisfying punch.
4) Release times dictate recovery:
After you’ve optimized attack for each desired track, you must now assign each of those tracks its own release setting, too. Again, starting with the kick, set your release to its longest possible setting. Next, decrease the time of the release until you hear the compression fully recover the kick’s volume before the next kick pulse begins. If the compression release is set at too large a value, then the next kick pulse will
 suffer unwanted gain reduction, (breathing or pumping). For the kick drum in our example (in the second illustration), the best compressor release setting turned out to be 17ms. Repeat this method for all other tracks needing optimum volume recovery.
5) Advanced Compression Settings:
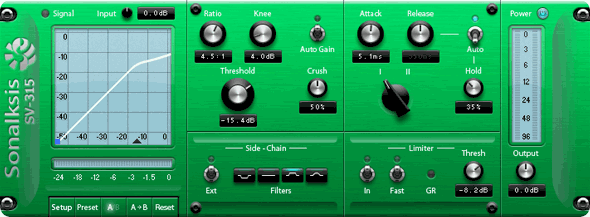
To explain compressor fundamentals, we used Kjaerhaus Audio’s Classic Compressor because it is straightforward and easy to use (and free). A more intricate device such as the Sonalksis SV-315 compressor above, can offer even greater control over signal processing. Understanding two of its key features, the “Crush” parameter, and the side-chain section, will enable you to take full advantage of our above advice while using more complex devices.
The “Crush” parameter, controls transient gain reduction. Imagine you try out our tips laid out above, but you want a little more snap on the attack of your kick. Lowering the crush parameter in the SV-315 will sharpen up the attacks of each pulse without otherwise altering threshold, ratio, attack or sustain. This technique is vital for preserving the original character of percussion such as crashes, hats, rides, tablas, triangles, and djembes, that have defined attacks, but often require a compressor boost.
The most notable feature of the SV-315 is the side-chain section. You’ll find a side-chain section on most pro compressors, gates, and limiters. If you tried our above tips using one of the SV-315’s presets, and didn’t notice any changes, it was probably because of the side-chain section. A side chained filter tells the compressor gain to respond to a specific range of frequencies. If the sample you’re using is devoid of those frequencies, then the compressor won’t respond. Most often, however, you can use these filters to achieve a more subtle compression. We should stress that this isn’t the same as filtering a signal using a resonant filter or an EQ. We’ll put it simply: when using a side-chain filter, some frequencies are routed to the gain control of the compressor, all frequencies pass through the compressor; in other words, some frequencies control the gain reduction, all frequencies are affected by the gain reduction. Dig?
The SV-315 possesses many more well-implemented features, but we figure you have enough to chew on now. Side-chaining is also an extremely useful production tool that we’ll explain in later tips. For now, try combining this tip with our previous tip on widening your beats, and we’re sure you’ll love the results it creates for your music. Stay tuned for more upcoming production tips, and Hit Reports!


 GET 20% OFF COUPON INSTANTLY W/ SIGN-UP!
 Check Out Hot Artists & Music Producers discovered through Song Submit!


my question concerns sampling. i know you can chop any given sample in to an indefinite number of chops. my question is : for example, i take a sample off a record where the only part i like is the bass line. however, theres trumpet and guitar goin on at the same time as my desired bassline. is there any way to go within this sample and cut out the guitar and trumpet? like cut out the highs and mids? if so, how do you do it??? please help me out, ive been tryin to find and answer for this and cant find it anywhere.
much love and respect.
You could notch out the highs and mids if all you wanted were your sub-bass frequencies, but usually that just muffles the bass timbre.
Historically, isolating tracks from original recordings has been impossible, but as technology advances, we get closer and closer to being able to separate the contents of original recorded material. Izotope RX, for example, can take a squeaking bench out of a piano recording, and leave the piano recording intact. Melodyne 3 can decipher pitches of a recording and allow you to transpose, say, one note of a guitar chord without noticeably affecting the original recording.
The safest bet is to re-create the bassline, but as Chuck D has pointed out, re-creations often just don’t hit the same as the original.
Here’s an answer to Your question Pascale Ubertino: a way you could do it is by cutting out all the low end of the sample so you cant hear the bass, but still being able to hear the guitar and trumpet if that’s possible, then recording that as audio into what ever program you use. Then record the same sample in but with the bass on it, make sure you record both at the same level of input. Then take the first recording with the just the guitar and trumpet and invert the phase, and make sure that both audio recordings are aligned perfectly, if done properly the trumpet and the guitar will phase cancel each other out leaving you with just the bass. Give this a shot and let me now how it worked for you.
Eric Lowry
how do i mix with sonar 6 producer editin
Yo! I recently purchased the hit theory book and tried the above mentioned techiniques when it came to compressing my tracks. I ran across two problems. 1) Reason 3.0 slowest attack time is 50ms and 2) my bass and kick tracks are overpowering my mix. Where did I go wrong?
Yo J,
First, are you using the M-Class compressor in reason 3? Minimum Attack time on the M-Class is definitely 1 ms.
Yup, I’m definitely using the M-Class compressor it’s in reason 4 though.
If you’re using the M-Class compressor, its minimum attack time is 1 millisecond. Your kick may be overpowering the rest of the mix if your compressing on the master channel with a low threshold.
yo! what eq settings is bst used for a grand piano
It depends on the rest of the mix, Sarz. What else is going on in the beat?
Is it better to sum to an analog to get more debth and width for drums and other instruments than mixing ITB. Your track to the intro of your website is hot. It that mixed on an SSL? How can I achieve that full mix. I love music and to get that sound would be a huge break for me.
Summing isn’t everything. You mentioned “SSL Racks.” Is it an SSL X-Rack that you use? If so, then yes, it’s worth the money. The problem is if the mix contains frequency conflicts, large spikes in amplitude, and other hazards, then it doesn’t matter whether you’re using $5000 summing hardware, or Garage band. Yes, there will be an appreciable difference in sound quality, but the mixing flaws will still make it through. Like we said before, check out the email tips, you’ll find some of our secrets in there. ;)
I have a two part question… One, what sample rate or resolution the professionals normally use 48khz, 88khz, 96khz? And much like J meek was asking.. I known most people want their kick drum to have punch through the mix and have presence but, mine really overpowers the mix. Anyway, other than compression, should I roll off some low frequencies?
Yo Blakkeyz,
The question is not only what rate or resolution the pros record at, but also what kind of AD/DA conversion they use. It depends on the pro. Generally speaking, songs are mastered at high resolution, 192KHz. (Check out the Tascam DVRA1000HD for example for an example of a mastering recorder).
If you’re running a home studio, master at the highest quality you can - 96KHz, 24bit, we’ll say - but remember that 44.1KHz, 16bit is the quality you need to make an audio CD.
Yo Hit Talk, I know ya’ll are experts on mixing so how should I go about compressing an long 808 kick to get that serious boom that make woofers pump that serious bass in the club without conflicting with my bassline and my kick and making the whole track sound muddy…Mind you I have some other synths in the track that are probably hogging the mid to high frequencies in the spectrum but I really want this track to sound clean. What do you reccomend? What plugins should I use?
yo Bill$,
Have you had a chance to check out the email tips? Your answer lies therein.
Hey guys what up,
I have a question:
I’m about to go to a studio to lay down vocals on a Hip-Hop track I produced. Now the beat sounds great the only problem is it sits at about -3.0 db (I purposely did that to leave room for vocals).Now If I try to boost it to sit at 0 db it clips and sounds distorted (to me). Should I leave it at -3.0 db since it sounds fine? Or should I tweak it to sit at 0 db? What would be the common practice?
Thanks guys!
You have to mix low enough so that you have enough room… so that you sit far enough away from 0dB; 3dB isn’t enough for vocals. Just pay attention to the clip indicators on the master bus of whatever mixing software/hardware, you’re using. You could use a brickwall limiter if you really wanted to max out your dB, but just mix and master, and manage your frequencies wisely… If you need to, carve out the frequency spectrum a little so that your vocals don’t conflict with other song elements.
If you’re bringing the beat to the studio for them to mix with your vocals, then give them as much resolution as you can while preserving your dynamics… so dont’ compress the beat, but make sure it’s not too low dB, or else you won’t be making the best use of your bit-depth - i.e., use all 16 (or 24) bits. Does that make sense?
So what level should my mix sit at if -3.0 db isn’t low enough?
It’s not just about dB level, John, it’s also about making room for the vocals in the mix. If you’ve got a synth that shares the same frequencies as your vocals, for example, your signal might clip at some of those frequencies. -3dB is plenty of volume for a demo master mix including the vocals, so just balance the vocals and beat until they sound good, and make sure they don’t clip., Don’t get too caught up worrying about where your dB should be.
I want to know how to get the kick and the baseline to get along together better. I like the low end weight on kicks at around like 60 hz, but how can I get the kick to sit right with the bass without destroying the baseline with eq and stuff? They sound good soloed, but usually one other the other is compromised when they are simultaneous.
Thanks y’all.
Hi Stephy Jey,
Have you tried tuning your kick to the “tonic” root note of the bass?. That might help your kick sit better with the bass. The Tonic is the first note in your scale.
Hope that helps.
can your release be faster than your attack?
I think you guys are doing a great work.
what do you mean by “assign each track it’s own compressor attack settings, one at a time”??? the way you put it it sounds like you can apply different settings within one compressor at the same time… dont know how that would be possible. can you please make that clear?
Hi…am a newbie in the mixin thin. One thing has bin bothering me. And this is it. Am a hippop artist and producer building a studio and most of the instruments i’ll be using will be samples kicks, snares etc. And i know that most of them are already compressed..so should i still go ahead and compress kicks and snare?..pls i need answers.
Avoid double compression. In fact, triple compression could become a culprit when you consider mastering as the final stage. If you are usually samples that are already compressed there’s no need to re-compress them. It’s important to remember the purpose of compression - to flatten, control, or sculpt the dynamics of an input signal. If dynamic control has been applied, no need for overkill.
If you’re dealing with very lightly compressed samples, then perhaps some additional compression layered over those signals would be tolerable. It’s best to use your ear and go with your intuition if any further compression is required.
@soldier: To compress each track within a production with its own individual settings, you need to apply a new occurrence / fx load of that compressor. In other words, to compress 10 tracks separately, load 10 episodes of the compressor (1 per track).